Welcome new comers to this new dimension where time will not bind you to explore this "TECHO STORM"

Please give your views about this Site and feel free to ask any query regarding technology. I am here to give you my best efforts. Do comment if you like any of my post.

I am happy to announce that the blog:zohsoft.blogspot has been moved to new domain "www.techostorm.com". Please visit regularly to be updated with new post coming soon.

Set classpath for java latest post

Last Updated: 04th May- 2011

Wednesday, May 4, 2011

Launch Virtual Keyboard

Window 7 has a special inbuilt tool that helps you to launch Virtual keyboard. Virtual keyboard is nothing but a keyboard inside the system which exactly work like an actual keyboard. You can use this just by clicking mouse and your character will be typed as if you are typing from real keyboard.

The virtual keyboard is very useful as it provide security against hacking of account and while during online transaction it is advisable to fill all your details and credit card number through Virtual Keyboard only.
It can be launched very easily. Just follow the few steps.

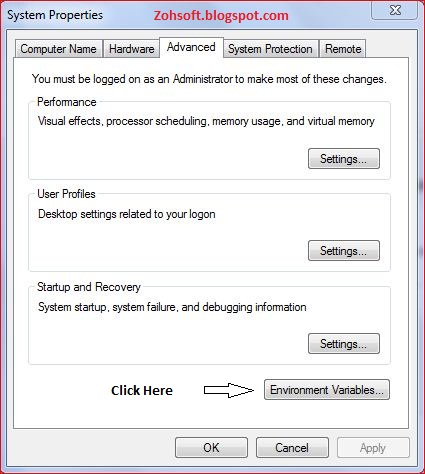
STEP 1: Press “WINDOW+R” button together. You will be shown the following screen shot. Type in “osk” and click ok.


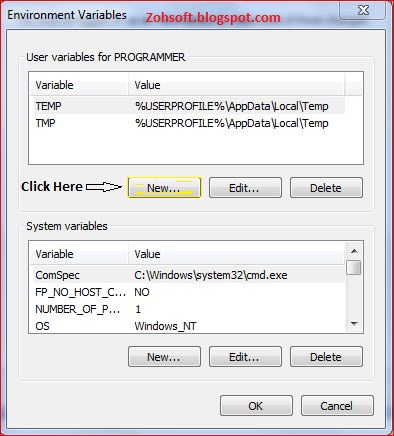
STEP 2: Your Virtual Keyboard is now ready to use. Use mouse Pointer to type the character you want to. The ON Screen Keyboard will look like this.


Thanks for your patience. For more tips and tricks always visits this site.

How to create a Dial-Up Network in Windows 7


A Dial-Up network is essential for connecting to a internet. It provides an interface which is used to connect through a telephone wire or even connecting a mobile to avail the internet facility.
Here is a tutorial which will guide you to create it by following certain easy steps.

STEP 1: Click on the wireless network icon in a taskbar as shown in a screen shot. Click on the “Open network sharing and center”.


STEP 2: A control panel window will get open and in that you have to click “Setup a new connection or network”.


Step 3: A new window will pop up in that you have to select “Connect to the internet” as shown in screen shot and click next.


 STEP 4: Select “No, create a new connection” option and click next.


STEP 5: Select the dialup option.


STEP 6: A new window will come in which select “Standard modem over bluetooth link” and click next.


STEP 7: In dialup number field type *99# and leave all the fields blank and click connect.


Your dialup network is created and you can check it by following step 1 and 2 and select “Change adapter setting” option. The name of your dial-up connection will be present there. 

You can even share your net when you will use this connection for internet. For this you have to share the connection first. 
Check it out my post for this. How to share connection for window 7

How to set ClassPath in JAVA in Windows 7 and Vista

 In order to run java Programs one needs to set PATH and CLASSPATH in java. Let us see how we can set this. It is very easy just follow few steps and you are done.

You can install java from the given link: Download JAVA


If you don’t have JAVA installed in your system or you didn’t set the path then the command use to compile java will not be recognized. First install the JAVA setup and then proceed to set the class path.


STEP 1: Just right click on “MY COMPUTER” and select “Properties”.


STEP 2: You will be directed to the following screenshot.


STEP 3: Click on “Advanced System Setting”.


STEP 4: Now Click on the “Environment Variable”.


STEP 5: Click “NEW” Button and copy the address (Refer note at last of this post). Go to “My computer>C drive>Program files>Java>jdk1.6.0_20>bin” copy the address and paste it but do add DOT and SEMICOLON before. The setup version may vary so it is better to go to the directory and copy the address instead of writing from this tutorial


STEP 6: Click ok and you will see that it will get added to the window as shown.


STEP 7: Click “New” again and go to“My computer>C drive>Program files>Java>jdk1.6.0_20>lib”. Copy the address and paste it but do add DOT and SEMICOLON as shown.


STEP 8: Click ok and it will also gets added to the “Environment Variable” window. Click ok to close all the window and finally you are done. Now go to command prompt and type “JAVAC” and press ENTER you will see some list and this shows that you have successfully set up the PATH and CLASSPATH in JAVA.

NOTE: In order to copy address Please go to

  1. My computer>C drive>Program files>Java>jdk1.6.0_20>bin
  2. My computer>C drive>Program files>Java>jdk1.6.0_20>lib

Do the same procedure for individuals address.


This is how you can copy address. Thanks for your patience. Please give your comments regarding this post and do ask any query regarding this.

Monday, May 2, 2011

GMail Drive- Access Gmail server space just like your drives

This is pretty interesting thing. Tired of managing space or shifting files but now one can easily keeps there documents safe in web server. Every body uses Gmail account and we all know that Gmail provides us around 7 GB of web space. We can hardly use around 1 or 2 GB of space and rest of our spaces cannot be utilize. Google brings out a new software GMAIL DRIVE which has the facility to login to your mail account like you are using any drive and then you can easily keeps your files or important documents by simply copying and paste.

Using GMAIL DRIVE will give you two benefits:
  1. You can keep your documents in web server like you keep it in your drives and moreover you need not upload any important document it to your mail and save it in draft like most people do.
  2. You can even create one public gmail account for 3 to 4 people and use Gmail drive for keeping documents related to your college work, project etc. .

How to setup GMAIL Drive ?
Its very easy just follow the steps and you will have your own GMAIL DRIVE.

STEP 1: First install the GMAIL DRIVE software from this link.
http://www.softpedia.com/get/Internet/E-mail/Mail-Utilities/GMail-Drive-shell-extension.shtml

STEP 2: It is small in size and can be easily downloaded. When it gets installed in your system then you will see an icon in MY COMPUTER.

Computer

STEP 3: Now click on the icon as shown above and you will be directed to the following screen.

login panel

STEP 4: Just type in the username and password of any gmail id and click ok to log-in.You must be connected to net while using GMAIL DRIVE facility. Now you are done. Its time to use it.

logging

Thanks for your patience. Please give your comments regarding this post whether you like it and feel free to ask any question you have.